> ## Documentation Index
> Fetch the complete documentation index at: https://www.seam.co/docs/llms.txt
> Use this file to discover all available pages before exploring further.
# Get started with Minut Sensors
> Learn how to connect and control your Minut sensors with the Seam API
Connect a Minut sensor to Seam, configure its noise thresholds, and receive an event when a threshold is triggered. Your application decides whether to show an alert or notify staff. The event reports a noise condition, not a recording of the conversation.
For a real device, complete the [Minut setup guide](./minut-setup-guide). [Create a Seam account and get an API key](https://console.seam.co/) to start with the virtual sensors used below.
## 1. Install Seam SDK
Seam provides client libraries for many languages, such as JavaScript, Python, Ruby, PHP, and others, as well as a Postman collection and [OpenAPI](https://connect.getseam.com/openapi.json) spec.
* JavaScript / TypeScript ([npm](https://www.npmjs.com/package/seam), [GitHub](https://github.com/seamapi/javascript))
* Python ([pip](https://pypi.org/project/seam/), [GitHub](https://github.com/seamapi/python))
* Ruby Gem ([rubygem](https://rubygems.org/gems/seam), [GitHub](https://github.com/seamapi/ruby))
* PHP ([packagist](https://packagist.org/packages/seamapi/seam), [GitHub](https://github.com/seamapi/php))
* C# ([nuget](https://www.nuget.org/packages/Seam), [GitHub](https://github.com/seamapi/csharp))
```bash theme={"dark"}
npm i seam
```
```bash theme={"dark"}
pip install seam
# For some development environments, use pip3 in this command instead of pip.
```
```bash theme={"dark"}
bundle add seam
```
```bash theme={"dark"}
composer require seamapi/seam
```
Install using [nuget](https://www.nuget.org/packages/Seam).
Once installed, [sign-up for Seam](https://console.seam.co/) to get your API key, and export it as an environment variable:
```
$ export SEAM_API_KEY=YOUR_SEAM_API_KEY
```
This guide uses a Sandbox Workspace. Only virtual sensors can be connected. If
you need to connect a real Minut sensor, use a non-sandbox workspace and API
key.
## 2. Link Minut Account with Seam
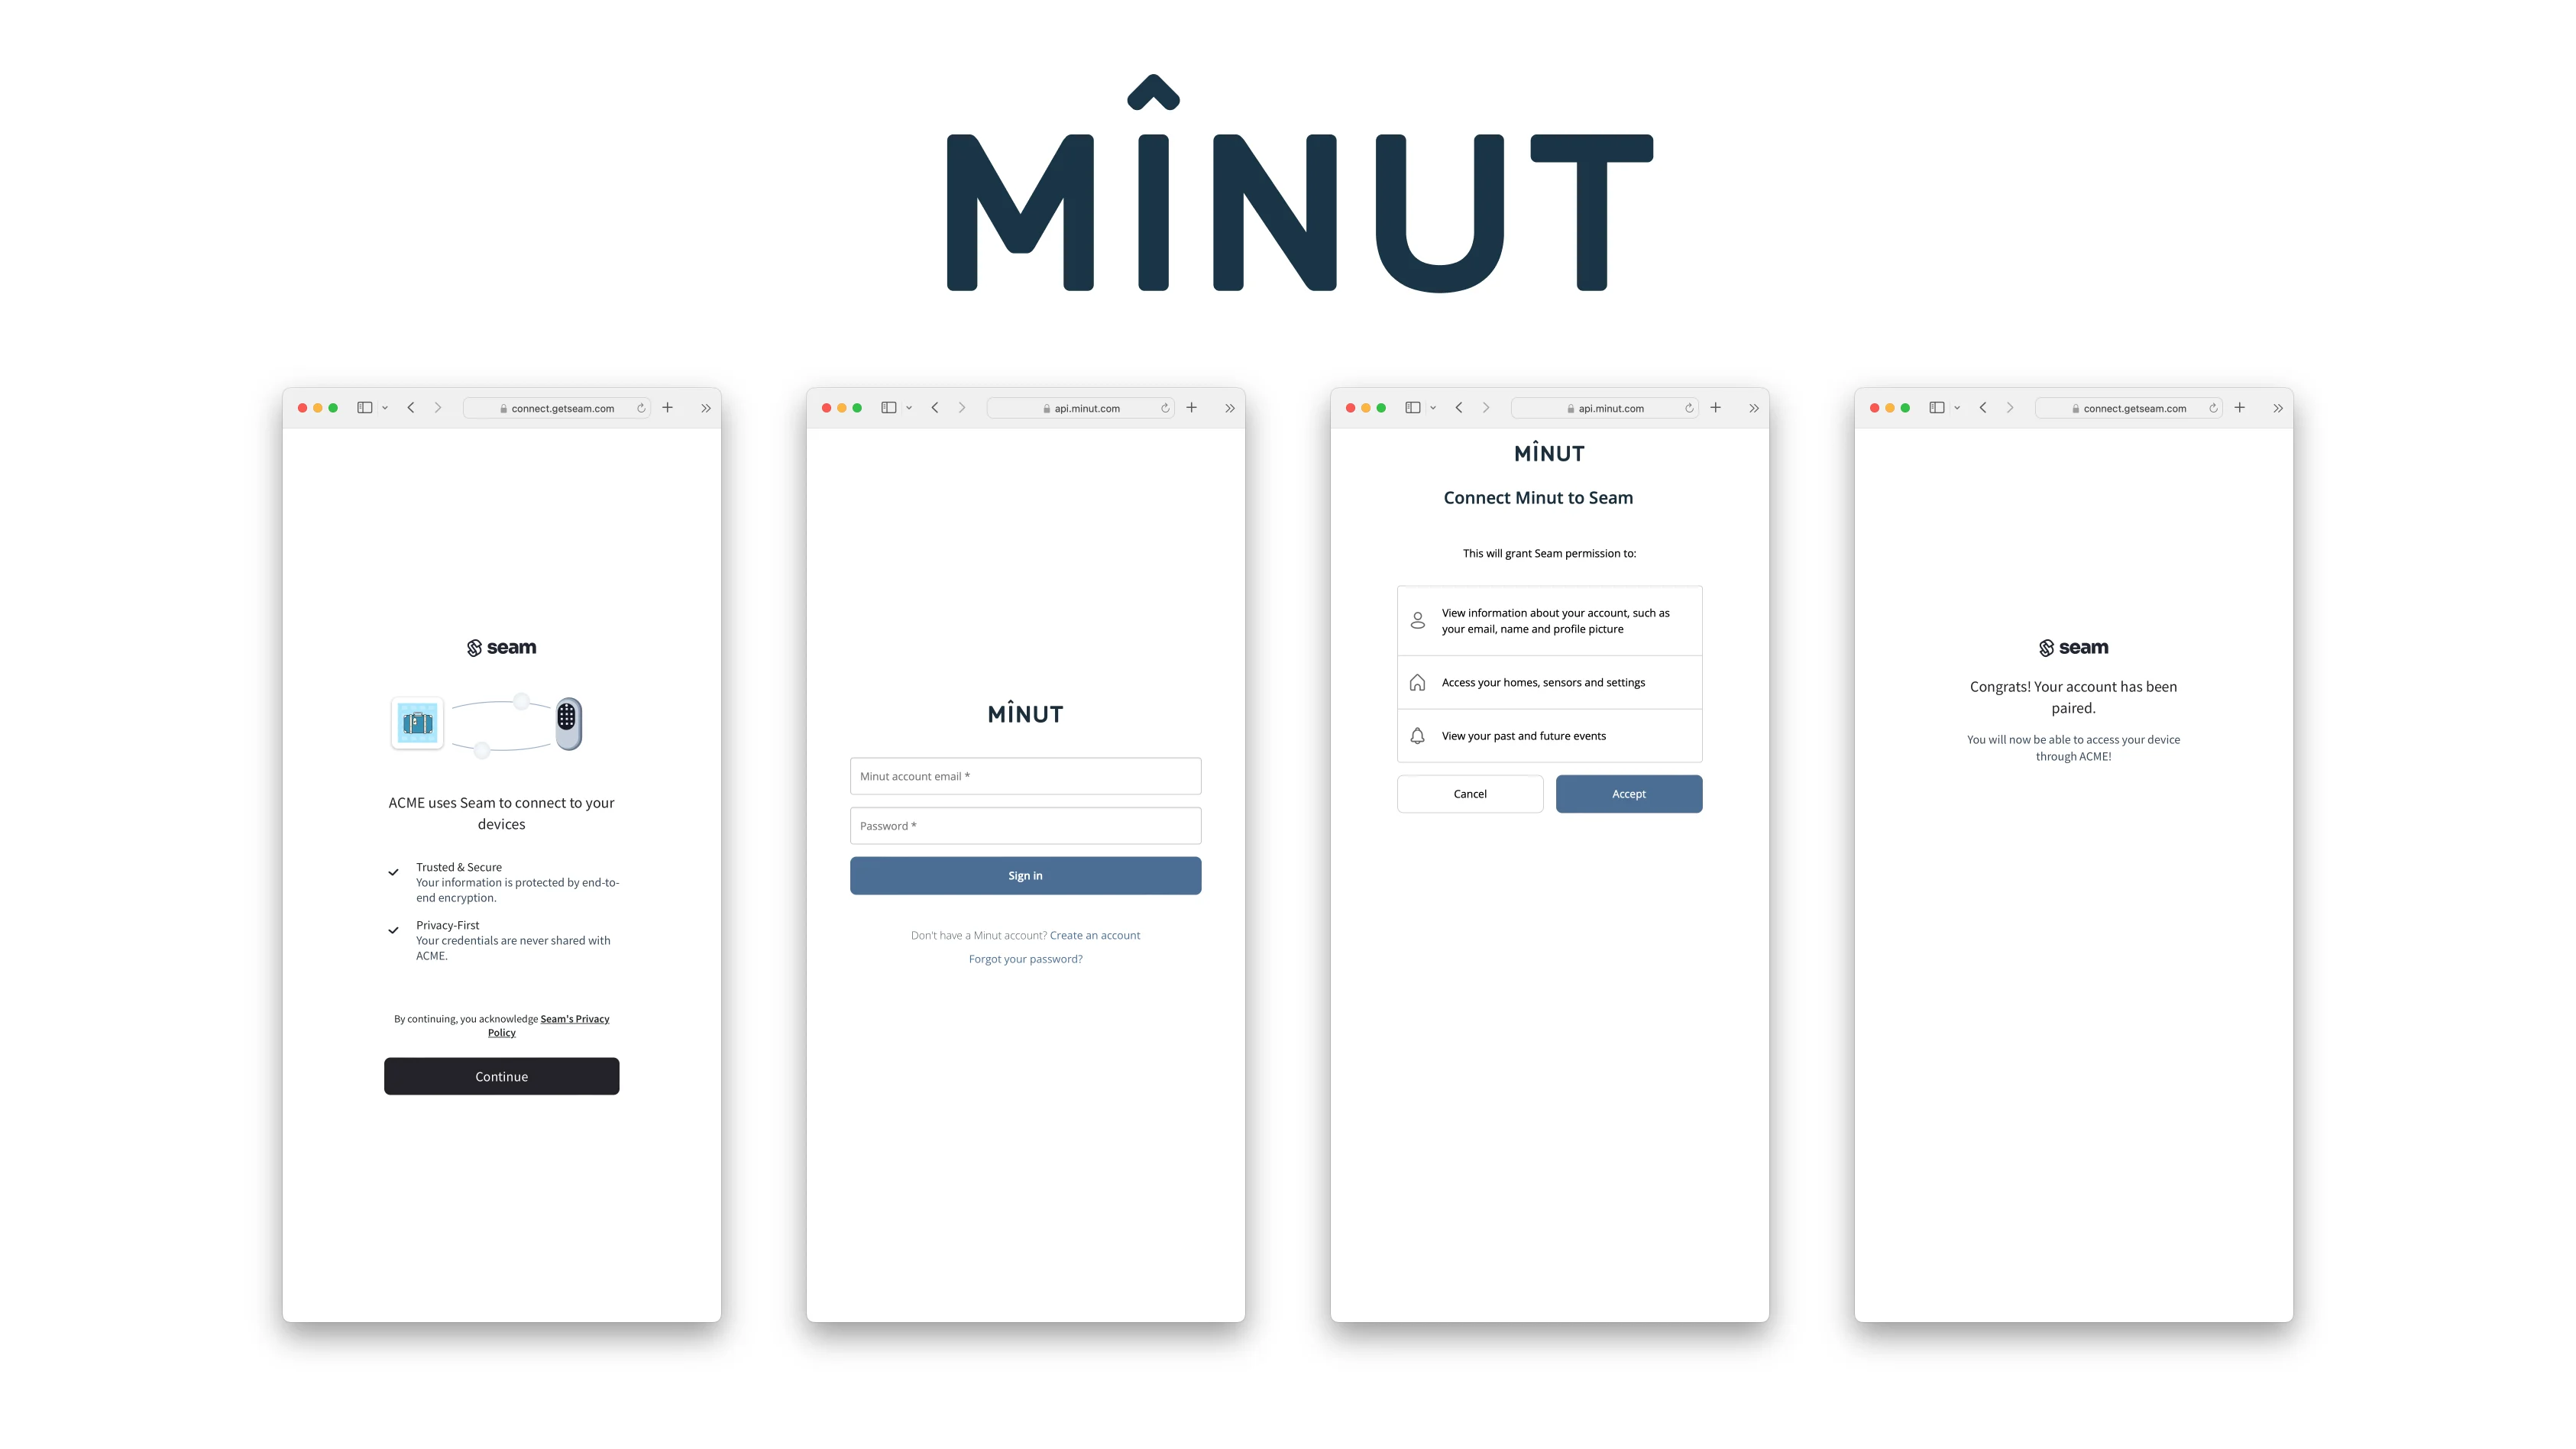
To control your Minut sensor via the Seam API, you must first authorize your Seam workspace against your Minut account. To do so, Seam provides [Connect Webviews](/docs/core-concepts/connect-webviews): pre-built UX flows that walk you through authorizing your application to control your Minut sensor.
### Create a Connect Webview
```javascript JavaScript theme={"dark"}
import { Seam } from 'seam'
const seam = new Seam()
const connectWebview = await seam.connectWebviews.create()
console.log(connectWebview.login_successful) // false
// Send the webview URL to your user
console.log(connectWebview.url)
```
```python Python theme={"dark"}
from seam import Seam
seam = Seam()
webview = seam.connect_webviews.create()
assert webview.login_successful is False
# Send this webview url to your user!
print(webview.url)
```
```ruby Ruby theme={"dark"}
require "seam"
seam = Seam.new(api_key: "MY_API_KEY")
webview = seam.connect_webviews.create()
puts webview.login_successful # false
# Send the webview URL to your user
puts webview.url
```
```php PHP theme={"dark"}
use Seam\SeamClient;
$seam = new SeamClient("YOUR_API_KEY");
$webview = $seam->connect_webviews->create();
echo json_encode($webview)
```
### Authorize Your Workspace
Navigate to the URL returned by the Webview object. Since you are using a sandbox workspace, complete the login flow by entering the Minut [sandbox test accounts ](./minut-noise-sensor-sample-data) credentials below:
* **email**: [jane@example.com](mailto:jane@example.com)
* **password**: 1234
 ### Get the New Webview
After you complete the login above, you'll get an event for [`connected_account.created`](/docs/api/connected_accounts/events#connected_account-created) if you set up a [webhook handler](/docs/developer-tools/webhooks). Otherwise you can just poll for the webview until its status changes, as shown below:
```javascript JavaScript theme={"dark"}
const updatedWebview = await seam.connectWebviews.get(
connectWebview.connect_webview_id,
)
console.log(updatedWebview.login_successful) // true
```
```python Python theme={"dark"}
updated_webview = seam.connect_webviews.get(
webview.connect_webview_id
)
assert updated_webview.login_successful # true
```
```ruby Ruby theme={"dark"}
updated_webview = seam.connect_webviews.get(connect_webview_id: webview.connect_webview_id)
puts updated_webview.login_successful # true
```
```php PHP theme={"dark"}
$webview = $seam->connect_webviews->get($webview->connect_webview_id);
echo json_encode($webview);
```
## 3. Retrieve Minut Noise Sensors
Minut noise sensors appear with the `device_type` `"minut_sensor"`. Read the returned properties to inspect the sensor's current state.
```javascript JavaScript theme={"dark"}
const devices = await seam.devices.list({
device_type: 'minut_sensor',
})
console.log(devices[0])
```
```python Python theme={"dark"}
sensors = seam.devices.list(device_type="minut_sensor")
sensors[0]
```
```ruby Ruby theme={"dark"}
seam.devices.list(
device_type: "minut_sensor"
).first
```
```php PHP theme={"dark"}
$devices = $seam->devices->list(device_type: 'minut_sensor');
echo json_encode($devices[0]);
```
## 4. Configure thresholds and receive noise events
Minut supports a regular noise threshold and an optional quiet-hours threshold. [Configure the thresholds](/docs/capability-guides/noise-sensors/configure-noise-threshold-settings) using the property's time zone, then subscribe to **`noise_sensor.noise_threshold_triggered`**. You can also [list events](/docs/api/events/list) to reconcile what happened.
Use the [complete receiving application](/docs/capability-guides/noise-sensors#receive-and-store-an-alert) to verify signatures and store one pending alert per event in a durable database. It acknowledges only after storage and handles repeated deliveries, including after a restart.
The payload includes `event_id`, `workspace_id`, `device_id`, `occurred_at` and `event_type`. Threshold details and `minut_metadata` may provide additional context. Follow the [current event contract](/docs/api/noise_sensors/noise_thresholds/events) rather than relying on a sample's optional provider fields.
```javascript JavaScript theme={"dark"}
const webhook = await seam.webhooks.create({
url: 'https://YOUR_APPLICATION_HOST/webhooks/seam',
event_types: ['noise_sensor.noise_threshold_triggered'],
})
// Store webhook.secret securely as SEAM_WEBHOOK_SECRET on your receiver.
// Do not log it or place it in browser code.
```
### Test in a sandbox
Set `MINUT_DEVICE_ID` to the virtual sensor you connected. Verify the workspace is a sandbox before calling the simulation endpoint.
```javascript JavaScript theme={"dark"}
const workspace = await seam.workspaces.get()
if (!workspace.is_sandbox) throw new Error('Use a sandbox for simulated events.')
await seam.noiseSensors.simulate.triggerNoiseThreshold({
device_id: process.env.MINUT_DEVICE_ID,
})
```
Check that the event reached your webhook and created one pending row. Replay the delivery and restart the receiver to check durable duplicate handling. This tests a simulated event delivered through the real webhook path; it does not test sound detection on a physical Minut sensor.
Delete a temporary test webhook when finished, using its returned `webhook_id`. Keep your production webhook configured for ongoing events.
## Next Steps
Now that you've completed this guide, you can try to connect a real Minut device. To do so, make sure to switch to a non-sandbox workspace and API key as real devices cannot be connected to sandbox workspaces.
If you have any questions or want to report an issue, email us at [support@seam.co](mailto:support@seam.co)
### Get the New Webview
After you complete the login above, you'll get an event for [`connected_account.created`](/docs/api/connected_accounts/events#connected_account-created) if you set up a [webhook handler](/docs/developer-tools/webhooks). Otherwise you can just poll for the webview until its status changes, as shown below:
```javascript JavaScript theme={"dark"}
const updatedWebview = await seam.connectWebviews.get(
connectWebview.connect_webview_id,
)
console.log(updatedWebview.login_successful) // true
```
```python Python theme={"dark"}
updated_webview = seam.connect_webviews.get(
webview.connect_webview_id
)
assert updated_webview.login_successful # true
```
```ruby Ruby theme={"dark"}
updated_webview = seam.connect_webviews.get(connect_webview_id: webview.connect_webview_id)
puts updated_webview.login_successful # true
```
```php PHP theme={"dark"}
$webview = $seam->connect_webviews->get($webview->connect_webview_id);
echo json_encode($webview);
```
## 3. Retrieve Minut Noise Sensors
Minut noise sensors appear with the `device_type` `"minut_sensor"`. Read the returned properties to inspect the sensor's current state.
```javascript JavaScript theme={"dark"}
const devices = await seam.devices.list({
device_type: 'minut_sensor',
})
console.log(devices[0])
```
```python Python theme={"dark"}
sensors = seam.devices.list(device_type="minut_sensor")
sensors[0]
```
```ruby Ruby theme={"dark"}
seam.devices.list(
device_type: "minut_sensor"
).first
```
```php PHP theme={"dark"}
$devices = $seam->devices->list(device_type: 'minut_sensor');
echo json_encode($devices[0]);
```
## 4. Configure thresholds and receive noise events
Minut supports a regular noise threshold and an optional quiet-hours threshold. [Configure the thresholds](/docs/capability-guides/noise-sensors/configure-noise-threshold-settings) using the property's time zone, then subscribe to **`noise_sensor.noise_threshold_triggered`**. You can also [list events](/docs/api/events/list) to reconcile what happened.
Use the [complete receiving application](/docs/capability-guides/noise-sensors#receive-and-store-an-alert) to verify signatures and store one pending alert per event in a durable database. It acknowledges only after storage and handles repeated deliveries, including after a restart.
The payload includes `event_id`, `workspace_id`, `device_id`, `occurred_at` and `event_type`. Threshold details and `minut_metadata` may provide additional context. Follow the [current event contract](/docs/api/noise_sensors/noise_thresholds/events) rather than relying on a sample's optional provider fields.
```javascript JavaScript theme={"dark"}
const webhook = await seam.webhooks.create({
url: 'https://YOUR_APPLICATION_HOST/webhooks/seam',
event_types: ['noise_sensor.noise_threshold_triggered'],
})
// Store webhook.secret securely as SEAM_WEBHOOK_SECRET on your receiver.
// Do not log it or place it in browser code.
```
### Test in a sandbox
Set `MINUT_DEVICE_ID` to the virtual sensor you connected. Verify the workspace is a sandbox before calling the simulation endpoint.
```javascript JavaScript theme={"dark"}
const workspace = await seam.workspaces.get()
if (!workspace.is_sandbox) throw new Error('Use a sandbox for simulated events.')
await seam.noiseSensors.simulate.triggerNoiseThreshold({
device_id: process.env.MINUT_DEVICE_ID,
})
```
Check that the event reached your webhook and created one pending row. Replay the delivery and restart the receiver to check durable duplicate handling. This tests a simulated event delivered through the real webhook path; it does not test sound detection on a physical Minut sensor.
Delete a temporary test webhook when finished, using its returned `webhook_id`. Keep your production webhook configured for ongoing events.
## Next Steps
Now that you've completed this guide, you can try to connect a real Minut device. To do so, make sure to switch to a non-sandbox workspace and API key as real devices cannot be connected to sandbox workspaces.
If you have any questions or want to report an issue, email us at [support@seam.co](mailto:support@seam.co)