> ## Documentation Index
> Fetch the complete documentation index at: https://www.seam.co/docs/llms.txt
> Use this file to discover all available pages before exploring further.

# Customizing Connect Webviews

> You can customize the look and feel, brand list, and behavior of your Connect Webviews.

You can use [Seam Console](/docs/core-concepts/seam-console/index) to customize the [Connect Webviews](./) that you present to your users through your app.

You can customize the following characteristics of your Connect Webviews:

* [Look and feel](#customize-the-look-and-feel-of-your-connect-webviews)
* [Brands (manufacturers) to display](#customize-the-brands-to-display-in-your-connect-webviews), by integration status or device type
* [Device types (capabilities) to connect](#customize-the-types-of-devices-to-connect)
* [Behavior settings](#customize-the-behavior-settings-of-your-connect-webviews), including `automatically_manage_new_devices` and `wait_for_device_creation`

***

## Customize the Look and Feel of Your Connect Webviews

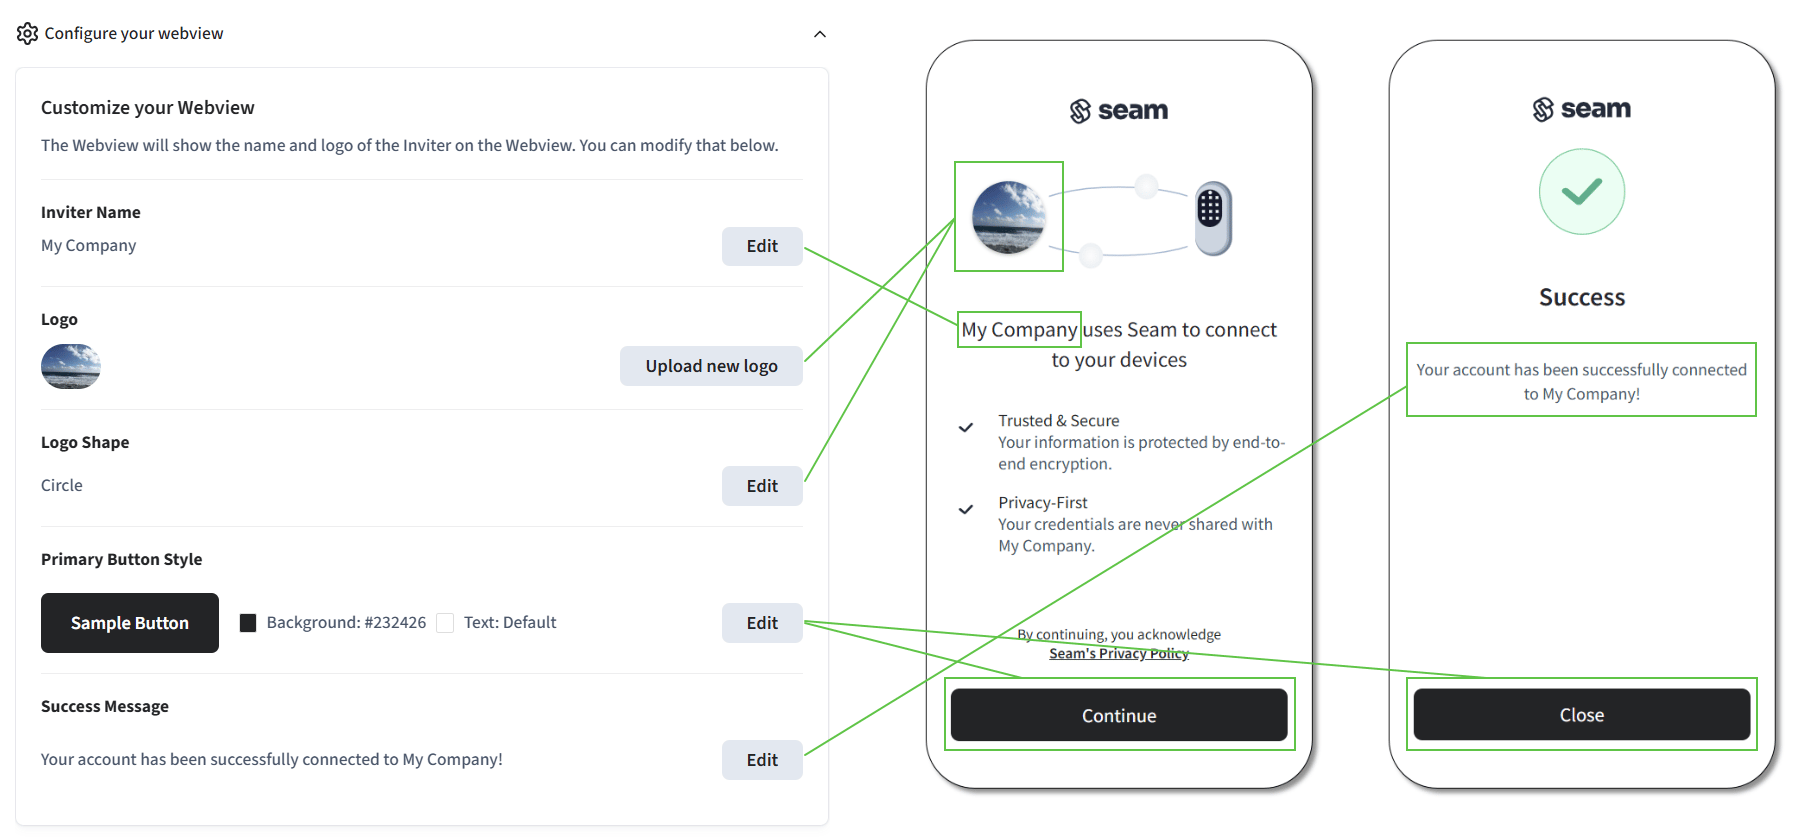
You can customize the look and feel of your Connect Webviews in the following ways:

* **Inviter name:** Define the name to display in your Connect Webviews as the entity requesting user authorization for Seam to access their device or access control system account.
* **Logo:** Choose a logo for your Connect Webviews. Ensure that the image file size does not exceed 1 MB.
* **Logo shape:** Select the shape of your logo displayed in Connect Webviews. Choices are **Circle** (default) or **Square**.
* **Primary button style:** Customize the background and text colors of the action button in your Connect Webview flow using a hex color code. The default color is #232426, which is almost black, and the default text color on the button is white.
* **Success message:** Customize the message that the Connect Webview displays when the connection completes successfully.

It is important to note that any changes you make to the customization features will apply to all of your new Connect Webviews.

<img src="https://mintcdn.com/seam/3MkQAe40a-b0KYcA/images/connect-webview-customization.png?fit=max&auto=format&n=3MkQAe40a-b0KYcA&q=85&s=86b4f55155de40acf123101248dd0214" alt="You can customize the look and feel of Connect Webviews." width="1801" height="840" data-path="images/connect-webview-customization.png" />

To customize the look and feel of your Connect Webviews:

1. In the top navigation pane of [Seam Console](https://console.seam.co/), click **Developer**.
2. In the left navigation pane, click **Webviews**.
3. On the **Webviews** page, click **Configure your webview**.
4. In the **Customize your Webview** pane, configure any of the following features:

   <table>
     <thead>
       <tr>
         <th width="229">Feature</th>
         <th>Instructions</th>
       </tr>
     </thead>

     <tbody>
       <tr>
         <td>Inviter name</td>

         <td>
           <ol>
             <li>
               In the <strong>Inviter Name</strong> area, click{' '}
               <strong>Edit</strong>.
             </li>

             <li>
               Type the desired inviter name and then click{' '}
               <strong>Save</strong>.
             </li>
           </ol>
         </td>
       </tr>

       <tr>
         <td>Logo</td>

         <td>
           <ol>
             <li>
               In the <strong>Logo</strong> area, click{' '}
               <strong>Upload new logo</strong>.
             </li>

             <li>
               Navigate to and select the image file that contains the desired
               logo.

               <br />

               The image file size cannot exceed 1 MB.
             </li>

             <li>
               Click <strong>Open</strong>.
             </li>
           </ol>
         </td>
       </tr>

       <tr>
         <td>Logo shape</td>

         <td>
           <ol>
             <li>
               In the <strong>Logo Shape</strong> area, click{' '}
               <strong>Edit</strong>.
             </li>

             <li>
               Select <strong>Circle</strong> or <strong>Square</strong> and
               then click <strong>Save</strong>.
             </li>
           </ol>
         </td>
       </tr>

       <tr>
         <td>Primary button style</td>

         <td>
           <ol>
             <li>
               In the <strong>Primary Button Style</strong> area, click{' '}
               <strong>Edit</strong>.
             </li>

             <li>
               Click the <strong>Button Background Color</strong> field and
               specify the desired color. Default: <code>#232426</code> (almost
               black).
             </li>

             <li>
               Click the <strong>Button Text Color</strong> field and specify
               the desired color. Default: <code>#ffffff</code> (white).
             </li>

             <li>
               Click <strong>Save</strong>.
             </li>
           </ol>
         </td>
       </tr>

       <tr>
         <td>Success message</td>

         <td>
           <ol>
             <li>
               In the <strong>Success Message</strong> area, click{' '}
               <strong>Edit</strong>.
             </li>

             <li>
               <p>
                 In the <strong>Message</strong> field, type the desired success
                 message.
               </p>

               <p>
                 To reset the success message, click <strong>Clear</strong>.
               </p>
             </li>

             <li>
               Click <strong>Save</strong>.
             </li>
           </ol>
         </td>
       </tr>
     </tbody>
   </table>

***

## Customize the Brands to Display in Your Connect Webviews

By default, a Connect Webview displays all of the stable providers that Seam supports. Leaving it that way is the recommended approach: your user picks whatever brand they actually own, and every provider Seam adds later becomes available to your users automatically, without you shipping a code change.

When you do need to narrow the set of brands a Connect Webview displays, narrow by *integration status* or *device type* rather than by brand:

* **By integration status** — specify a [`provider_category`](/docs/core-concepts/connect-webviews/connect-webview-process#step-1-create-a-connect-webview), such as `stable` or `beta`, in the [Create Connect Webview](/docs/api/connect_webviews/create) request.
* **By device type** — specify [`accepted_capabilities`](#customize-the-types-of-devices-to-connect), such as `lock` or `thermostat`.

Both approaches keep working as Seam's provider coverage grows, because they describe *what you need* rather than naming individual brands.

<CodeGroup>
  ```javascript JavaScript theme={"dark"}
  // Recommended: display every stable provider Seam supports.
  await seam.connectWebviews.create()

  // Or narrow by integration status when you need to.
  await seam.connectWebviews.create({
    provider_category: 'stable',
  })
  ```

  ```bash cURL theme={"dark"}
  # Recommended: display every stable provider Seam supports.
  curl -X 'POST' \
    'https://connect.getseam.com/connect_webviews/create' \
    -H 'accept: application/json' \
    -H "Authorization: Bearer ${SEAM_API_KEY}" \
    -H 'Content-Type: application/json' \
    -d '{}'
  ```

  ```python Python theme={"dark"}
  # Recommended: display every stable provider Seam supports.
  seam.connect_webviews.create()

  # Or narrow by integration status when you need to.
  seam.connect_webviews.create(provider_category="stable")
  ```

  ```ruby Ruby theme={"dark"}
  # Recommended: display every stable provider Seam supports.
  seam.connect_webviews.create()

  # Or narrow by integration status when you need to.
  seam.connect_webviews.create(provider_category: "stable")
  ```
</CodeGroup>

***

### Device Provider Keys

Seam identifies each provider with a device provider key. These keys appear on device and provider resources and in the [List Device Providers](/docs/api/devices/list_device_providers) response, so you will encounter them when inspecting what a user connected. Seam supports the following device provider keys:

| Provider Name                                                                                                                    | Device Provider Key             |
| -------------------------------------------------------------------------------------------------------------------------------- | ------------------------------- |
| [2N](/docs/device-and-system-integration-guides/2n-intercom-systems)                                                                  | `my_2n`                         |
| [4SUITES](/docs/device-and-system-integration-guides/4suites-locks)                                                                   | `four_suites`                   |
| [Akiles](/docs/device-and-system-integration-guides/akiles-locks)                                                                     | `akiles`                        |
| [Akuvox](https://akuvox.com/)                                                                                                    | `akuvox`                        |
| [ASSA ABLOY Credential Service](/docs/device-and-system-integration-guides/assa-abloy-vingcard-credential-services)                   | `assa_abloy_credential_service` |
| [ASSA ABLOY Visionline Access Control System](/docs/device-and-system-integration-guides/assa-abloy-visionline-access-control-system) | `visionline`                    |
| [August Home](/docs/device-and-system-integration-guides/august-locks)                                                                | `august`                        |
| [Avigilon Alta](/docs/device-and-system-integration-guides/avigilon-alta-access-system)                                               | `avigilon_alta`                 |
| [Brivo](/docs/device-and-system-integration-guides/brivo-access)                                                                      | `brivo`                         |
| [ControlByWeb](/docs/device-and-system-integration-guides/controlbyweb-relays)                                                        | `controlbyweb`                  |
| [DoorKing](https://www.doorking.com/)                                                                                            | `doorking`                      |
| [Dormakaba Community](/docs/device-and-system-integration-guides/dormakaba-community-access-control-system)                           | `dormakaba_community`           |
| [Dormakaba Oracode](/docs/device-and-system-integration-guides/dormakaba-oracode-locks)                                               | `dormakaba_oracode`             |
| [ecobee](/docs/device-and-system-integration-guides/ecobee-thermostats)                                                               | `ecobee`                        |
| [Genie Aladdin Connect](https://www.geniecompany.com/aladdin-connect-by-genie)                                                   | `genie`                         |
| [Honeywell Resideo](/docs/device-and-system-integration-guides/honeywell-thermostats)                                                 | `honeywell_resideo`             |
| [igloohome](/docs/device-and-system-integration-guides/igloohome-locks)                                                               | `igloohome`                     |
| [Kwikset](/docs/device-and-system-integration-guides/kwikset-locks)                                                                   | `kwikset`                       |
| [Latch](/docs/device-and-system-integration-guides/latch-access-control-system)                                                       | `latch`                         |
| [Linear](https://linear-solutions.com/)                                                                                          | `linear`                        |
| [Lockly](/docs/device-and-system-integration-guides/lockly-locks)                                                                     | `lockly`                        |
| [Minut](/docs/device-and-system-integration-guides/minut-sensors)                                                                     | `minut`                         |
| [Nest](/docs/device-and-system-integration-guides/google-nest-thermostats)                                                            | `google_nest`                   |
| [NoiseAware](/docs/device-and-system-integration-guides/noiseaware-sensors)                                                           | `noiseaware`                    |
| [Nuki](/docs/device-and-system-integration-guides/nuki-locks)                                                                         | `nuki`                          |
| [PTI Storlogix Cloud](/docs/device-and-system-integration-guides/pti-storlogix-cloud)                                                 | `pti`                           |
| [Salto KS Access System](/docs/device-and-system-integration-guides/salto-ks-access-control-system)                                   | `salto_ks`                      |
| [Salto KS Locks](/docs/device-and-system-integration-guides/salto-locks)                                                              | `salto_ks`                      |
| [Salto ProAccess Space Access System](/docs/device-and-system-integration-guides/salto-proaccess-space-access-system)                 | `salto_space`                   |
| [Schlage](/docs/device-and-system-integration-guides/schlage-locks)                                                                   | `schlage`                       |
| [Sensi](/docs/device-and-system-integration-guides/sensi-thermostats)                                                                 | `sensi`                         |
| [SmartThings](/docs/device-and-system-integration-guides/smartthings-hubs-+-devices/get-started-with-smartthings-hubs-+-smart-locks)  | `smartthings`                   |
| [Tedee](/docs/device-and-system-integration-guides/tedee-locks)                                                                       | `tedee`                         |
| [TTLock](/docs/device-and-system-integration-guides/ttlock-locks)                                                                     | `ttlock`                        |
| [Wyze](/docs/device-and-system-integration-guides/wyze-locks)                                                                         | `wyze`                          |
| [Yale](/docs/device-and-system-integration-guides/yale-locks)                                                                         | `yale`                          |

To learn what each provider supports, use the [List Device Providers](/docs/api/devices/list_device_providers) method. The information that this method returns for each provider includes a set of [capability flags](../../capability-guides/device-and-system-capabilities#capability-flags), such as `device_provider.can_remotely_unlock`. If at least one supported device from a provider has a specific capability, the corresponding capability flag is `true`.

***

## Customize the Types of Devices to Connect

<Info>
  Currently, the only provider that supports multiple device types is
  SmartThings.
</Info>

Some providers support multiple device types, like smart locks and thermostats. To specify which types of devices your users can connect to Seam for a provider that supports multiple device types, use the `accepted_capabilities` parameter when creating a Connect Webview. This parameter is especially applicable when the Connect Webview [`automatically_manage_new_devices`](#automatically_manage_new_devices) parameter is `true`. Set `accepted_capabilities` to an array containing one or more of the following values to indicate the capabilities of the devices that the Connect Webview can accept:

* `lock`
* `thermostat`
* `noise_sensor`

Seam maintains a default value for this parameter for each provider. For example, for SmartThings, the default value for `accepted_capabilities` is `["locks"]`. To begin accepting SmartThings-connected thermostats, as well as locks, set `accepted_capabilities` to `["locks", "thermostats"]`. For Honeywell Resideo, the default value is `["thermostats"]`.

## Customize the Behavior Settings of Your Connect Webviews

You can use the following two properties to customize the behavior of your Connect Webviews:

* [`automatically_manage_new_devices`](#automatically_manage_new_devices)
* [`wait_for_device_creation`](#wait_for_device_creation)

You configure these properties when you are creating the Connect Webview. Consequently, you can customize these two characteristics for each of your Connect Webviews.

### `automatically_manage_new_devices`

Seam charges fees for different parts of the API, like connecting a device, creating an access code or thermostat schedule, and creating an access control system user. To learn more, contact our team. You can exclude specific devices from your bill by marking them as "[unmanaged](../devices/managed-and-unmanaged-devices)."

The default value for `automatically_manage_new_devices` is `true`. Consequently, by default, Seam imports all devices and makes them available for use. However, if you set this property to `false`, Seam sets the `is_managed` property for all new devices to `false` (that is, unmanaged) when a user first connects their account to Seam.

### `wait_for_device_creation`

This property enables you to specify whether Seam should finish syncing all devices in a newly-connected account before completing the associated Connect Webview.

The default value for `wait_for_device_creation` is `false`. If `wait_for_device_creation` is `false`, you should wait for `connected_account.completed_first_sync` before retrieving your devices. This event indicates that Seam has finished the first sync of the connected account, and the connected devices are available.

Alternately, if you set `wait_for_device_creation` to `true`, Seam finishes syncing all devices in the newly-connected account before proceeding to the final page of the Connect Webview. In this case, you can fetch your devices immediately upon the completion of the Connect Webview.